Overview: From Signup to First Job in Minutes
Whether you’re on a trial or paid subscription, the initial setup steps are the same—and they’re designed to get you up and running quickly. These settings lay the foundation so your jobs, invoices, and communications are branded and ready for action.
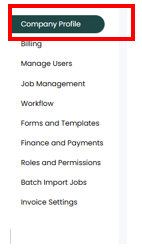
To begin, click the Gear Icon > Settings in the top-right corner of your screen. (Admin access required.)
![]()
Initial Setup – create your first job within minutes
Company Profile (5 minutes)
Start by adding or editing your company details. This includes your company name, phone number, email, and physical address—everything your clients will see on estimates, invoices, and communications. You can also upload your company logo here to ensure your branding looks sharp on forms, estimates, and invoices.
Add Team Members (5 Minutes)
Bring your crew into ContractQ to stay connected, coordinated, and in control. Adding your team ensures that everyone—whether they’re in the office or out in the field—is working from the same playbook.
To get started, go to Settings and click on Manage Users. From there, you can invite new users by email and assign their license type:
- Full License: Grants access to all available features, with customizable user permissions to control what each team member can view or edit. Ideal for office staff, sales, or project managers.
- Subcontractor License: Designed for limited access—subs can view their schedules, upload job photos, and add notes, helping keep your projects documented and everyone in sync without giving access to sensitive business info.
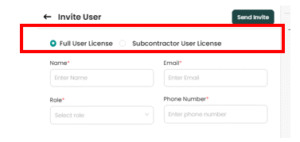
Once invited, users will receive an email with instructions to create their password and log in. You’ll be connected and ready to roll in minutes.
Job Management (5-10 minutes)
Now that your account and team are set, it’s time to lay the foundation for how you’ll organize your work. In this step, you’ll define key elements that help structure your jobs and reporting—making it easier to track performance and stay consistent.
From Settings, navigate to the Job Management section, where you can:
- Job Types – Common categories for the kind of work you’re doing, such as Full Install or Repair. These labels help categorize and filter jobs at a glance.
- Trades – Define the primary service categories your business offers (e.g., Roofing, Painting, HVAC).
- Sub–Trades – Add more specific specialties within a trade, allowing for finer detail. For example, under Roofing, you might include Shingle Replacement, Flat Roof Coating, or Gutter Work.
- Referral Sources – Track how new clients found you, whether it’s Google, Yard Sign, Referral, or Social Media.
- Promotions – Set up a list of your company’s current or past promotions. This is a simple tracker—no logic or automatic discounts—just a flag to indicate whether a job is tied to a promotion.
- Custom Fields – Enable additional fields unique to your workflow, such as Color Selection, Permit Number, or any other job-specific detail you want to track
Setting these up now ensures consistency across your jobs and gives you more control over how your team tracks and communicates job info.
That’s all you need to be up and running and ready to create your first job in ContractQ. With your company profile set and your team added, you’ve already laid the groundwork. If you’re ready to hit the ground running, go ahead and create your first job now.
